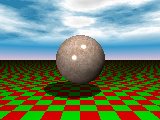
先ほどの直方体を球に変えてみましょう。球は石の材質にして,ついでに空と地平面の模様も変えてみましょう。

|
#include "colors.inc" #include "woods.inc" #include "skies.inc" #include "stones.inc" //石の素材集 camera { location <0, 0, -10> } light_source { <-10, 3, -20> color White } sky_sphere { S_Cloud2 } //空の指定 plane { y, -3 pigment { checker color Green color Red } //縞模様 } sphere { <0, 0, 0> //中心 2 //半径 texture { T_Stone2 } //石の材質 } |
どうも思ったとおりの色が出ませんね。それに画像が少しくらい感じがしませんか。それは光が弱いからです。複数の光を当ててみましょう。どうです? 急に明るい色になりましたね。

|
#include "colors.inc" #include "woods.inc" #include "skies.inc" #include "stones.inc" camera { location <0, 0, -10> } light_source { //第1の光 <-10, 3, -20> color White } light_source { //第2の光 <2, 8, -6> color White } sky_sphere { S_Cloud2 } plane { y, -3 pigment { checker color Green color Red } } sphere { <0, 0, 0> 2 texture { T_Stone2 } } |
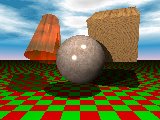
いよいよ最後の仕上げです。いくつもの物体を同時に描画してみましょう。物体が重なるときは移動しましょう。移動するときは「translate <x,y,z>」で指定します。

|
#include "colors.inc" #include "woods.inc" #include "skies.inc" #include "stones.inc" #include "glass.inc" //ガラスの素材集 camera { location <0, 0, -10> } light_source { <-10, 3, -20> color White } sky_sphere { S_Cloud2 } plane { y, -3 pigment { checker color Green color Red } } box { <-2, -2, -1> < 2, 2, 3> texture { T_Wood7 } //木材の材質 rotate <-30,20,0> translate <3,2,1> //移動 } sphere { <0, 0, 0> //中心 2 //半径 texture { T_Stone2 } //石の材質 } cone { <0, -2, 0>, 1.6 //一端の中心と半径 <0, 2, 0>, 0.8 //他端の中心と半径 texture { T_Orange_Glass } //ガラスの材質 rotate <20,10,0> //回転 translate <-3,2,1> //移動 } |
できた画像を印刷してみましょう。せっかくですから大きさは「320×240」にしてみましょう。左上の「File」メニューから「Print」を選んで実行してみましょう。