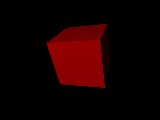
先ほどは赤,緑,青の3色を混ぜて色を作りましたが,もっと簡単に指定できたらいいですね。そのために色を集めた“素材集”(インクルード・ファイルといいます)が用意されています。それを用いて物体の色(赤)と光の色(白)を指定しましょう。
|
#include "colors.inc" //色の素材集の呼び出し camera { location <0, 0, -10> } light_source { <-10, 3, -20> color White //白色 } box { <-2, -2, -1> < 2, 2, 3> pigment { color Red } //赤色 rotate <-30,20,0> } |
素材集には他にも色々あります。先ほどの物体の赤を木材の材質に変えてみましょう。

|
#include "colors.inc" #include "woods.inc" //木の素材集 camera { location <0, 0, -10> } light_source { <-10, 3, -20> color White } box { <-2, -2, -1> < 2, 2, 3> texture { T_Wood1 } //木の材質 rotate <-30,20,0> } |
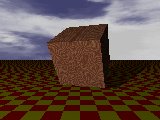
背景が黒ではちょっと味気ないですね。背景の空と地平面を作成してみましょう。どうです。急にCGっぽくなってきましたね。
|
#include "colors.inc" #include "woods.inc" #include "skies.inc" //空の素材集 camera { location <0, 0, -10> } light_source { <-10, 3, -20> color White } sky_sphere { S_Cloud5 } //空の指定 plane { y, -3 //y軸方向の平面 pigment { checker color Yellow color Red } //縞模様 } box { <-2, -2, -1> < 2, 2, 3> texture { T_Wood1 } rotate <-30,20,0> } |